Function Defects_Bug_FieldCanChange(FieldName, NewValue)
If FieldName = “BG_STATUS” Then
OldValue = Bug_Fields.Field(“BG_STATUS”).Value
If OldValue = “New” And NewValue = “Open” Then
Defects_Bug_FieldCanChange = True
ElseIf OldValue = “Closed” And NewValue = “Open” Then
Defects_Bug_FieldCanChange = True
Else
‘ Any other transition is denied.
Defects_Bug_FieldCanChange = False
End If
Else
Defects_Bug_FieldCanChange = True
End If
End Function
Script to change the Password of Quality Center
Function Project_CanLogin(DomainName, ProjectName, UserName)
‘ First Check the password.
If TDConnection.Password = “” Then
MsgBox “Your user id does not have any password defined. Please contact the project administrator.”, 0, “Error”
Project_CanLogin = False
Exit Function
ElseIf Len(TDConnection.Password) < 8 Then
MsgBox “Your password length is too short. You have to change your password now and log in again.”, 0, “Error”
Project_PasswordChange UserName
Project_CanLogin = False
Exit Function
End If
Project_CanLogin = True
End Function
Sub Project_PasswordChange(UserName)
OldPassword = InputBox(“Type in your old password:”, “Password Change”)
Select Case OldPassword
Case “”
MsgBox “You will not be allowed to log into this project.”
Exit Sub
End Select
NewPassword1 = InputBox(“Type a new password with 8 or more characters:”, “Password Change”)
Select Case NewPassword1
Case “”
MsgBox “You will not be allowed to log into this project.”
Exit Sub
Case Else
If Len(NewPassword1) < 8 Then
MsgBox “Your password is too short, please type a longer password.”, 0, “Error”
Project_PasswordChange UserName
Exit Sub
End If
End Select
NewPassword2 = InputBox(“Retype your new password:”, “Password Change”)
If NewPassword1 = NewPassword2 Then
On Error Resume Next
TDConnection.ChangePassword OldPassword, NewPassword1
If Err.Number <> 0 Then
MsgBox “Your password was not changed:” & vbNewLine & Err.Description, 0, “Error”
Else
MsgBox “Your password has been successfully changed”, 0, “Information”
End If
On Error GoTo 0
Else
MsgBox “Password is invalid.”, 0, “Error”
End If
End Sub
QTP Script to get the MAC Address
PROCEDURE UuidCreate EXTERNAL "rpcrt4.dll":U :
DEFINE INPUT-OUTPUT PARAMETER opi-guid AS CHARACTER NO-UNDO.
END PROCEDURE.
PROCEDURE UuidCreateSequential EXTERNAL "rpcrt4.dll":U :
DEFINE INPUT-OUTPUT PARAMETER opi-guid AS CHARACTER NO-UNDO.
END PROCEDURE.
FUNCTION inttohex RETURNS CHARACTER (INPUT i AS INTEGER):
/* only for 0..255 integer values */
DEFINE VARIABLE cHex AS CHARACTER NO-UNDO INIT '0123456789ABCDEF':U.
DEFINE VARIABLE j1 AS INTEGER NO-UNDO.
DEFINE VARIABLE j2 AS INTEGER NO-UNDO.
j1 = TRUNCATE(i / 16, 0) .
j2 = i - (j1 * 16).
RETURN SUBSTR(cHex, j1 + 1, 1) + SUBSTR(cHex, j2 + 1, 1).
END.
FUNCTION GetMacAddress RETURNS CHAR:
DEFINE VARIABLE X AS CHARACTER NO-UNDO.
DEFINE VARIABLE i AS INTEGER NO-UNDO.
DEFINE VARIABLE j AS INTEGER NO-UNDO.
DEFINE VARIABLE r AS CHARACTER NO-UNDO.
X = FILL(' ':U, 16).
IF RunningWindows2000() THEN
RUN UuidCreateSequential (INPUT-OUTPUT X).
ELSE
RUN UuidCreate (INPUT-OUTPUT X).
DO i = 11 TO 16:
r = r + ' ':U + inttohex(ASC(SUBSTR(X,i,1))).
END.
RETURN SUBSTR(R,2).
END.
DISPLAY GetMAcAddress() FORMAT "X(20)":U.
DEFINE INPUT-OUTPUT PARAMETER opi-guid AS CHARACTER NO-UNDO.
END PROCEDURE.
PROCEDURE UuidCreateSequential EXTERNAL "rpcrt4.dll":U :
DEFINE INPUT-OUTPUT PARAMETER opi-guid AS CHARACTER NO-UNDO.
END PROCEDURE.
FUNCTION inttohex RETURNS CHARACTER (INPUT i AS INTEGER):
/* only for 0..255 integer values */
DEFINE VARIABLE cHex AS CHARACTER NO-UNDO INIT '0123456789ABCDEF':U.
DEFINE VARIABLE j1 AS INTEGER NO-UNDO.
DEFINE VARIABLE j2 AS INTEGER NO-UNDO.
j1 = TRUNCATE(i / 16, 0) .
j2 = i - (j1 * 16).
RETURN SUBSTR(cHex, j1 + 1, 1) + SUBSTR(cHex, j2 + 1, 1).
END.
FUNCTION GetMacAddress RETURNS CHAR:
DEFINE VARIABLE X AS CHARACTER NO-UNDO.
DEFINE VARIABLE i AS INTEGER NO-UNDO.
DEFINE VARIABLE j AS INTEGER NO-UNDO.
DEFINE VARIABLE r AS CHARACTER NO-UNDO.
X = FILL(' ':U, 16).
IF RunningWindows2000() THEN
RUN UuidCreateSequential (INPUT-OUTPUT X).
ELSE
RUN UuidCreate (INPUT-OUTPUT X).
DO i = 11 TO 16:
r = r + ' ':U + inttohex(ASC(SUBSTR(X,i,1))).
END.
RETURN SUBSTR(R,2).
END.
DISPLAY GetMAcAddress() FORMAT "X(20)":U.
QTP Script to download file from Unix Box or RDP to local machine
Set pop = CreateObject("wscript.shell")
Const DEFAULT_FTP_PORT=21
Const SERVICE_FTP=1
Const OPEN_TYPE_DIRECT=1
Const FTP_TRANSFER_TYPE_ASCII=1
Extern.Declare micLong, "InternetOpen", "wininet.dll", "InternetOpenA", micString, micDWord, micString, micString, micDWord
Extern.Declare micLong, "InternetConnect", "wininet.dll", "InternetConnectA", micLong, micString, micInteger, micString, micString, micDWord, micDWord, micDWord
Extern.Declare micInteger,"FtpGetFile","wininet.dll","FtpGetFile",micLong, micString,micString,micInteger,micDWord,micDWord,micDWord
Extern.Declare micInteger,"FtpPutFile","wininet.dll","FtpPutFileA",micLong, micString, micString, micDWord
Extern.Declare micLong, "FtpSetCurrentDirectory","wininet.dll","FtpSetCurrentDirectoryA",micLong, micString
Extern.Declare micLong, "FtpCommand", "wininet.dll", "FtpCommandA", micLong,micLong, micInteger, micString, micInteger, micLong
Extern.Declare micLong, "FtpDeleteFile", "wininet.dll", "FtpDeleteFileA", micLong, micString
Extern.Declare micInteger, "InternetCloseHandle", "wininet.dll", "InternetCloseHandle", micLong
objInternet=Extern.InternetOpen("QTP_FTP", 1, vbNullChar, vbNullChar,0)
If objInternet <> 0 then
objConnect=Extern.InternetConnect(objInternet,"< server_ip >", DEFAULT_FTP_PORT,"< username >","< password >",1,0,0)
If objConnect <> 0 then
val = Extern.FtpSetCurrentDirectory(objConnect,"/")
remote_path = "< file path >"
val = Extern.FtpSetCurrentDirectory(objConnect, remote_path)
If val <> 0 Then
remote_file_name = "< file name >"
val=Extern.FtpGetFile(objConnect, remote_file_name,"< local_machine_path >,0,0,1,0)
'val=Extern.FtpPutFile(objConnect,sLocalFile,sRemoteFile,0)
'val = FtpDeleteFile( objConnect, remote_file_name)
If CBool(val) <> 0 then
pop.popup "Downloaded Successfully" , 2
Reporter.ReportEvent micPass,"FtpPutFile","File Downloaded Successfully"
else
Reporter.ReportEvent micFail,"FtpGetFile","Failed to download file"
pop.popup val , 2
end if
else
pop.popup "Failed to Set the Directory" , 2
Reporter.ReportEvent micFail,"FtpGetFile","Failed to Set the Directory"
End If
else
pop.popup "Failed to Connect server" , 2
Reporter.ReportEvent micFail,"FtpGetFile","Failed to Connect server"
end if
else
pop.popup "Internet Connection Not Opened" , 2
Reporter.ReportEvent micFail,"FtpGetFile","Internet Connection Not Opened"
end if
Extern.InternetCloseHandle(objConnect)
Extern.InternetCloseHandle(objInternet)
Set pop = Nothing
QTPro Parametrization
1.Objectives
2.Describe and use multiple parameter types.
3.Drive data in multiple iterations.
4.Analyze errors during iterations.
5.Parameterize a checkpoint.
Input Parameters For Data driven Tests :
-Input Parameters For Data Driven Tests
-A data-driven test is one that runs a set of user actions with multiple input values. -Data driving allows one script to test application functionality with many sets of data.
-Automated data driven testing frees you to perform more tests, thus increasing test coverage. Speed, repeatability, free resources to do other kinds of quality control.
Input Parameter
-Input Parameters allow you to replace a static, recorded value in a step with a dynamic placeholder (parameter), which represents an expandable range of values.
-Input parameter names and their values are located in QuickTest’s Data Table.
-Input parameter values are input into the application from some outside data source.
Steps to Create An Input Parameter :
To create an input data table parameter:
-Select the step in the Keyword View that contains the recorded input value.
-From the Value column, click on the current value.
-Click on the parameterize button.
-The Constant value appears in the Value Configuration Options dialog box.
Set the Parameter Value :
-In the VALUE CONFIGURATION OPTIONS dialog, select the Parameter radio button and ensure that Data Table is selected from the drop-down list.
-From the Name drop down list, enter a unique column name to create a new column in your data table or choose an existing column name from the data table.
-Use the default Global data sheet to store values.
-Enter the values that QTP will input after the test executes.
Supply Data to the Parameter :
-The design-time table is the central location for storing input parameter values.
-The number of rows in the data table will cause the same number of test execution iterations to be run.
-As a default, the design-time data table is displayed at the bottom of the QuickTest screen.
-If you want to show or hide the data sheet, click on the icon in the toolbar.
Verify The Test Run :
-View the Test Results window to verify that each of the rows from the Design Time Data Table was used during the test run.
-Expand the tree for each iteration (Row#) to view specific information about the execution of the specific row.
Parameterize a Checkpoint :
-You can use parameterized expected values to make your checkpoints dynamic. They Can be set on:
-An object property in the Object Repository.
-A checkpoint on a parameterized field
A Test with Multiple Actions :
-Actions can be divided into logical sections, like the main sections of a transaction, or by specific business processes.
-When you create a new test, it contains one action. By dividing your tests into multiple actions, you can design more modular and efficient tests.
Types of Actions
There are two kinds of actions:
1.Regular (Non-reusable)
2.Reusable
Tests that contain reusable actions can be used:
1.Locally
2.Externally
Insert Call to a New Action :
-You can add a new action during or after recording.
-Select Insert ? New Action from the QuickTest main menu. The Insert New Action window appears.
-Or use the “logo” icon on the toolbar to insert new action.
Using Parameterized Data :
-Test data can be passed from one test to another test using the value of an input parameter.
-This creates a data flow between business processes.
-The value passed from one business process to another will come from the Data Table.
-Be aware of any data dependencies that occur within the business process.
Copied, Existing or New Action :
-After reusable actions are created, they can be called into a “Main Calling” test in three ways:
-Call to New Action
-Call to Copy of Action
-Call to Existing Action
Set Actions as Reusable :
-Create a reusable action from the Action properties dialog.
-Check the checkbox and click OK. A message will appear stating a description of a reusable action.
Call An Action :
-You can do number of things with a reusable action, such as:
-Call it multiple times within a test.
-Call it from other tests.
-View the components of the action tree (you cannot modify them except in the original script)
-Insert a call to an external action (the action is inserted in read-only format) as local editable copy use the (read only) data from the original action
-Insert copies of non-reusable actions into your test, but you cannot insert calls to non-reusable actions.
One Action used Many Times :
-Rather than recording the login process three times in three separate tests, and enhancing this part of the script (with checkpoints and parameterization) separately for each test, you can create an action that logs into the application in one test.
-Best Practice
Inserting calls to existing actions makes it easier to maintain our tests; when an object or procedure in your application changes. It only needs to be updated one time, in the original action.
Set Actions as Reusable :
-Create a reusable action from the Action properties dialog.
-Check the checkbox and click OK. A message will appear stating a description of a reusable action.
On Action – Two Names :
-Use the Action Properties – General tab to modify the default label.
-This makes the test easier for others to understand when viewing the test from the Keyword View tree.
-Right-Click on Action and enter a logical name for the business process.
External Action Properties :
-An external action is a reusable action created in another test. The external action is inserted into the calling test in a read-only format.
-Data from the external action’s data sheet can be imported as a local, editable copy or kept as read only. If read-only, the data can only be modified from the original test.
-After a reusable action is called, you will see the parameters contained in each test appear in the Global or Local sheet depending on where you stored them in the original test.
Action Run Settings :
-Since there are two (or more) tests running, one right after another, you may need to specify the iteration for each separately.
-To affect the run settings for a particular action, set them in the Action Call Properties dialog box.
-Right-Click on the Action label in the Keyword View, and choose Action Call Properties from the list provided.
Defining an Action :
-The Action Properties dialog box enables you to define options for the stored action.
-You can modify an action name, add or modify an action description, and set an action as reusable.
Passing Values to a Called Action :
-You can also define input and output parameters to be used by the action.
-These settings apply each time the action is called.
Using an Action Parameter :
-Once parameters have been set in Action Properties, you can tell QTPro that the parameter type being used is an Action Parameter.
The Test Flow List :
-The Test Flow List:
1.Changes with the addition of a reusable action.
2.Enables viewing of the action tree for a selected reusable or external action.
-The test flow appears when a test is recognized as having called actions in your test.
-An action tree displays all the details of the selected reusable or external action.
Action Data Structure :
In the Action data structure, each Action will have its own:
-Folder with an object repository
-Local data table sheet
-Run settings
Multiple Reusable Actions :
When using multiple, reusable actions, keep the following in mind:
1.Actions can be called or copied from another test.
2.Run settings have to be set per action
3.As a default, all actions in a test use the same shared Object Repository.
4.Parameters and data from the called test are reflected in the calling test
5.An action can be deleted or an action call can be deleted.
6.Position your action calls separately or nest them with other actions.
Delete an Action :
-Because reusable actions can be used throughout your test or test set, when you delete an action, you must decide to delete a specific occurrence of the action and/or all of its calls.
-A confirmation message(yes/no) appear when you are about to delete a non-reusable action.
2.Describe and use multiple parameter types.
3.Drive data in multiple iterations.
4.Analyze errors during iterations.
5.Parameterize a checkpoint.
Input Parameters For Data driven Tests :
-Input Parameters For Data Driven Tests
-A data-driven test is one that runs a set of user actions with multiple input values. -Data driving allows one script to test application functionality with many sets of data.
-Automated data driven testing frees you to perform more tests, thus increasing test coverage. Speed, repeatability, free resources to do other kinds of quality control.
Input Parameter
-Input Parameters allow you to replace a static, recorded value in a step with a dynamic placeholder (parameter), which represents an expandable range of values.
-Input parameter names and their values are located in QuickTest’s Data Table.
-Input parameter values are input into the application from some outside data source.

Steps to Create An Input Parameter :
To create an input data table parameter:
-Select the step in the Keyword View that contains the recorded input value.
-From the Value column, click on the current value.
-Click on the parameterize button.
-The Constant value appears in the Value Configuration Options dialog box.

Set the Parameter Value :
-In the VALUE CONFIGURATION OPTIONS dialog, select the Parameter radio button and ensure that Data Table is selected from the drop-down list.
-From the Name drop down list, enter a unique column name to create a new column in your data table or choose an existing column name from the data table.
-Use the default Global data sheet to store values.
-Enter the values that QTP will input after the test executes.

Supply Data to the Parameter :
-The design-time table is the central location for storing input parameter values.
-The number of rows in the data table will cause the same number of test execution iterations to be run.
-As a default, the design-time data table is displayed at the bottom of the QuickTest screen.
-If you want to show or hide the data sheet, click on the icon in the toolbar.

Verify The Test Run :
-View the Test Results window to verify that each of the rows from the Design Time Data Table was used during the test run.
-Expand the tree for each iteration (Row#) to view specific information about the execution of the specific row.

Parameterize a Checkpoint :
-You can use parameterized expected values to make your checkpoints dynamic. They Can be set on:
-An object property in the Object Repository.
-A checkpoint on a parameterized field

A Test with Multiple Actions :
-Actions can be divided into logical sections, like the main sections of a transaction, or by specific business processes.
-When you create a new test, it contains one action. By dividing your tests into multiple actions, you can design more modular and efficient tests.

Types of Actions
There are two kinds of actions:
1.Regular (Non-reusable)
2.Reusable
Tests that contain reusable actions can be used:
1.Locally
2.Externally
Insert Call to a New Action :
-You can add a new action during or after recording.
-Select Insert ? New Action from the QuickTest main menu. The Insert New Action window appears.
-Or use the “logo” icon on the toolbar to insert new action.

Using Parameterized Data :
-Test data can be passed from one test to another test using the value of an input parameter.
-This creates a data flow between business processes.
-The value passed from one business process to another will come from the Data Table.
-Be aware of any data dependencies that occur within the business process.

Copied, Existing or New Action :
-After reusable actions are created, they can be called into a “Main Calling” test in three ways:
-Call to New Action
-Call to Copy of Action
-Call to Existing Action

Set Actions as Reusable :
-Create a reusable action from the Action properties dialog.
-Check the checkbox and click OK. A message will appear stating a description of a reusable action.

Call An Action :
-You can do number of things with a reusable action, such as:
-Call it multiple times within a test.
-Call it from other tests.
-View the components of the action tree (you cannot modify them except in the original script)
-Insert a call to an external action (the action is inserted in read-only format) as local editable copy use the (read only) data from the original action
-Insert copies of non-reusable actions into your test, but you cannot insert calls to non-reusable actions.

One Action used Many Times :
-Rather than recording the login process three times in three separate tests, and enhancing this part of the script (with checkpoints and parameterization) separately for each test, you can create an action that logs into the application in one test.
-Best Practice
Inserting calls to existing actions makes it easier to maintain our tests; when an object or procedure in your application changes. It only needs to be updated one time, in the original action.


Set Actions as Reusable :
-Create a reusable action from the Action properties dialog.
-Check the checkbox and click OK. A message will appear stating a description of a reusable action.

On Action – Two Names :
-Use the Action Properties – General tab to modify the default label.
-This makes the test easier for others to understand when viewing the test from the Keyword View tree.
-Right-Click on Action and enter a logical name for the business process.


External Action Properties :
-An external action is a reusable action created in another test. The external action is inserted into the calling test in a read-only format.
-Data from the external action’s data sheet can be imported as a local, editable copy or kept as read only. If read-only, the data can only be modified from the original test.
-After a reusable action is called, you will see the parameters contained in each test appear in the Global or Local sheet depending on where you stored them in the original test.

Action Run Settings :
-Since there are two (or more) tests running, one right after another, you may need to specify the iteration for each separately.
-To affect the run settings for a particular action, set them in the Action Call Properties dialog box.
-Right-Click on the Action label in the Keyword View, and choose Action Call Properties from the list provided.

Defining an Action :
-The Action Properties dialog box enables you to define options for the stored action.
-You can modify an action name, add or modify an action description, and set an action as reusable.

Passing Values to a Called Action :
-You can also define input and output parameters to be used by the action.
-These settings apply each time the action is called.

Using an Action Parameter :
-Once parameters have been set in Action Properties, you can tell QTPro that the parameter type being used is an Action Parameter.

The Test Flow List :
-The Test Flow List:
1.Changes with the addition of a reusable action.
2.Enables viewing of the action tree for a selected reusable or external action.
-The test flow appears when a test is recognized as having called actions in your test.
-An action tree displays all the details of the selected reusable or external action.

Action Data Structure :
In the Action data structure, each Action will have its own:
-Folder with an object repository
-Local data table sheet
-Run settings
Multiple Reusable Actions :
When using multiple, reusable actions, keep the following in mind:
1.Actions can be called or copied from another test.
2.Run settings have to be set per action
3.As a default, all actions in a test use the same shared Object Repository.
4.Parameters and data from the called test are reflected in the calling test
5.An action can be deleted or an action call can be deleted.
6.Position your action calls separately or nest them with other actions.
Delete an Action :
-Because reusable actions can be used throughout your test or test set, when you delete an action, you must decide to delete a specific occurrence of the action and/or all of its calls.

-A confirmation message(yes/no) appear when you are about to delete a non-reusable action.
QTP Synchronization and Check Points
Synchronization
Objectives
1.Define Synchronization.
2.How to synchronize the Test
3.Some Visual Cue Examples
4.Examine when and where synchronization is most helpful.
5.Add a synchronization step for a specified object.
What is Synchronization ?
-Synchronization is a step added to a test that instructs QuickTest to wait for the state of a property on a particular object to change before proceeding to the next step in the test.
-This is done while in RECORD mode.
-The user/test waits for a visual indication that a step has completed so that the user/test can take the next step.
How to synchronize the Test
-We can synchronize the test by
1.Inserting a synchronization point
Insert -> Step -> Synchronization point
Window(“Flights”).WinButton(“Update order”).WaitProperty”enabled”,1,1000
2.Adding Exist and Wait statements
status=Window(“Flights”).Dialog(“Flights Table”).Exist
Wait(10)
Some Visual Cue Examples
-Synchronization point enables the anticipated time problems between the application and QTP.
-A progress bar reaches 100% completion.
-A status message appears.
-A button becomes enabled.
-A window opens and is ready for data entry.
-A pop-up message appears in response to an operation.
Examine the Application
Quick Test defaults to allocating the same amount of time for every object.
-Wait times often occur before an object becomes available for the next step. For example, in the Flights application, once the Insert Order button has been clicked, a process bar must complete to yield the Order No. associated with the reservation. The process bar may require additional time before the test can proceed. If insufficient time is allocated for these special circumstances, the test may fail.
The error message “Object not enabled” appears if QTP is running a test and proceeds to the next step before the previous step has fully processed.
Add a Synchronization Step While Recording
-Synchronization points which instruct QuickTest to pause until an object property achieves a specific value. The easiest method is to add a synchronization point while recording.
-A Synchronization step can be added manually after a test is recorded , as well.
-Always add the synchronization point immediately after the step to be synchronized.
-From the QTP menu bar, choose INSERT-> STEP-> SYNCHRONIZATION POINT
Checkpoints
-A checkpoint is a verification point that compares a current value for a specified property with the expected value for that property.
-We can Insert checkpoint
1.From Menu
Insert -> Checkpoint -> Standard Checkpoint
2.From Keyword view
3.From the Active Screen
Checkpoint Types
1.Standard Checkpoint
2.Image Checkpoint
3.Table Checkpoint
4.Page Checkpoint
5.Text Checkpoint
6.Text Area Checkpoint
7.Bitmap Checkpoint
8.Database Checkpoint
Insert A Checkpoint From The Active Screen
-A checkpoint can be added after a test is created.
-Use the Active Screen to select the field on which the checkpoint will be added.
-Right-click on the appropriate field and choose “Insert Standard Checkpoint”.
Regular Expressions
-Regular expressions enable Quick Test to Identify Objects and text strings with varying values.
Use a Regular Expression
-A regular expression is a string that specifies a complex search phrase. By using
-special characters you define the conditions of the search.
-Note: There are 4 steps to ensure that a regular expression is inserted correctly.
-From the Checkpoint Properties window, ensure Constant is enabled and click on the note paper icon.
-Check Regular Expression checkbox.
-If QTP sees there are characters that can be misconstrued as a regular expression, it will ask you to treat it as a literal character. Generally, you will answer No.
-Add the regular expression. For example, above figure will use [A-Z a-z]+.
Objectives
1.Define Synchronization.
2.How to synchronize the Test
3.Some Visual Cue Examples
4.Examine when and where synchronization is most helpful.
5.Add a synchronization step for a specified object.
What is Synchronization ?

-Synchronization is a step added to a test that instructs QuickTest to wait for the state of a property on a particular object to change before proceeding to the next step in the test.
-This is done while in RECORD mode.
-The user/test waits for a visual indication that a step has completed so that the user/test can take the next step.
How to synchronize the Test
-We can synchronize the test by
1.Inserting a synchronization point
Insert -> Step -> Synchronization point
Window(“Flights”).WinButton(“Update order”).WaitProperty”enabled”,1,1000
2.Adding Exist and Wait statements
status=Window(“Flights”).Dialog(“Flights Table”).Exist
Wait(10)
Some Visual Cue Examples
-Synchronization point enables the anticipated time problems between the application and QTP.
-A progress bar reaches 100% completion.
-A status message appears.
-A button becomes enabled.
-A window opens and is ready for data entry.
-A pop-up message appears in response to an operation.
Examine the Application

Quick Test defaults to allocating the same amount of time for every object.
-Wait times often occur before an object becomes available for the next step. For example, in the Flights application, once the Insert Order button has been clicked, a process bar must complete to yield the Order No. associated with the reservation. The process bar may require additional time before the test can proceed. If insufficient time is allocated for these special circumstances, the test may fail.
The error message “Object not enabled” appears if QTP is running a test and proceeds to the next step before the previous step has fully processed.
Add a Synchronization Step While Recording

-Synchronization points which instruct QuickTest to pause until an object property achieves a specific value. The easiest method is to add a synchronization point while recording.
-A Synchronization step can be added manually after a test is recorded , as well.
-Always add the synchronization point immediately after the step to be synchronized.
-From the QTP menu bar, choose INSERT-> STEP-> SYNCHRONIZATION POINT
Checkpoints
-A checkpoint is a verification point that compares a current value for a specified property with the expected value for that property.
-We can Insert checkpoint
1.From Menu
Insert -> Checkpoint -> Standard Checkpoint
2.From Keyword view
3.From the Active Screen
Checkpoint Types
1.Standard Checkpoint
2.Image Checkpoint
3.Table Checkpoint
4.Page Checkpoint
5.Text Checkpoint
6.Text Area Checkpoint
7.Bitmap Checkpoint
8.Database Checkpoint
Insert A Checkpoint From The Active Screen

-A checkpoint can be added after a test is created.
-Use the Active Screen to select the field on which the checkpoint will be added.
-Right-click on the appropriate field and choose “Insert Standard Checkpoint”.
Regular Expressions
-Regular expressions enable Quick Test to Identify Objects and text strings with varying values.
Use a Regular Expression

-A regular expression is a string that specifies a complex search phrase. By using
-special characters you define the conditions of the search.
-Note: There are 4 steps to ensure that a regular expression is inserted correctly.
-From the Checkpoint Properties window, ensure Constant is enabled and click on the note paper icon.
-Check Regular Expression checkbox.
-If QTP sees there are characters that can be misconstrued as a regular expression, it will ask you to treat it as a literal character. Generally, you will answer No.
-Add the regular expression. For example, above figure will use [A-Z a-z]+.
Object Repository in QTPro
The Object Repository
Objectives
-Define what a Quick Test Professional object is.
-Describe the role of the Object repository
-Identify a given object as part of a class.
-Describe how objects are recognized by Quick Test Professional.
-Use the Object Repository to find and add objects.
-Change object logical names using the Keyword View.
Object Types
-A Quick Test Professional object is a graphic user element in an application, such as a button or a drop-down list.
-Objects are categorized into classes. Buttons, Graphic Images and Edit Boxes are a few examples of class types.
QuickTest Object Properties
-In the example above, there are several objects called Buttons, two of which are:
1.Update Order
2.Delete Order.
-The only way to distinguish one object from the other of the same class is by the difference in object characteristics. Specific characteristics of an object within QuickTest are called object properties.
Recognizes Objects
-QTP uses a method when it learns objects during the recording process.
-QTP first looks at the object you are recording and stores it as a test object, determining its object class. For example, Qtp might classify the test object as a standard Windows dialog box or a web button.
-For each object class, QTP has a default set of properties that it always learns.
-Usually, only a few properties are needed to uniquely identify an object.
Assigning a Logical Name
-After learning the class and properties of an object, QTP assigns a name to the object. This is known as the object’s logical name.
-QTP refers to the object in a recorded test by using its logical name.
-Edit the logical name to make it more descriptive if you wish.
-The logical name given to an object during recording may be sufficient, but changing a logical name can give clarity to the test and the documentation that is generated.
Stored Test Objects
-Recorded object properties are stored in QTP’s Object Repository.
-Each test has its own Object Repository, by default..
-These “stored” objects are referred to as “ Test Objects”.
-The purpose of a Test Object is to represent application objects in the test.
-During a test run, QTP uses the Test Object to search for a match in the application during run time.
Steps to change A Logical Name
You can change an object’s logical name in the OBJECT REPOSITORY.
-Right-click on the object at the KEYWORD VIEW level.
-Choose OBJECT PROPERTIES.
-Click on the REPOSITORY button.
The Object Properties Dialog
Once in the Object repository:
1.Right-click the object in the repository tree.
2.Choose RENAME.
3.Type a descriptive name for the object.
4.Click OK.
QuickTest Documentation
-QuickTest updates the object name and documents it in the documentation field of the Keyword View.
-IMPORTANT: if you start a brand new test, the test will record the original, default object names in the Object Repository.
Object Repository
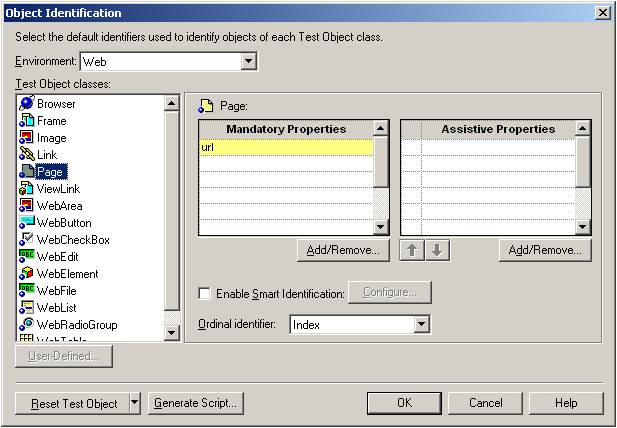
Object Repository: Object identification default properties
Resources->Object Repository
Resources -> Object Repository Manager
Resources -> Associate Repositories
Resources -> Object Repository
Object Repository -> Merging tool
Object Repository -> Comparison Tool
Objectives
-Define what a Quick Test Professional object is.
-Describe the role of the Object repository
-Identify a given object as part of a class.
-Describe how objects are recognized by Quick Test Professional.
-Use the Object Repository to find and add objects.
-Change object logical names using the Keyword View.
Object Types

-A Quick Test Professional object is a graphic user element in an application, such as a button or a drop-down list.
-Objects are categorized into classes. Buttons, Graphic Images and Edit Boxes are a few examples of class types.
QuickTest Object Properties
-In the example above, there are several objects called Buttons, two of which are:
1.Update Order
2.Delete Order.
-The only way to distinguish one object from the other of the same class is by the difference in object characteristics. Specific characteristics of an object within QuickTest are called object properties.
Recognizes Objects
-QTP uses a method when it learns objects during the recording process.
-QTP first looks at the object you are recording and stores it as a test object, determining its object class. For example, Qtp might classify the test object as a standard Windows dialog box or a web button.
-For each object class, QTP has a default set of properties that it always learns.
-Usually, only a few properties are needed to uniquely identify an object.
Assigning a Logical Name

-After learning the class and properties of an object, QTP assigns a name to the object. This is known as the object’s logical name.
-QTP refers to the object in a recorded test by using its logical name.
-Edit the logical name to make it more descriptive if you wish.
-The logical name given to an object during recording may be sufficient, but changing a logical name can give clarity to the test and the documentation that is generated.
Stored Test Objects

-Recorded object properties are stored in QTP’s Object Repository.
-Each test has its own Object Repository, by default..
-These “stored” objects are referred to as “ Test Objects”.
-The purpose of a Test Object is to represent application objects in the test.
-During a test run, QTP uses the Test Object to search for a match in the application during run time.
Steps to change A Logical Name

You can change an object’s logical name in the OBJECT REPOSITORY.
-Right-click on the object at the KEYWORD VIEW level.
-Choose OBJECT PROPERTIES.
-Click on the REPOSITORY button.
The Object Properties Dialog

Once in the Object repository:
1.Right-click the object in the repository tree.
2.Choose RENAME.
3.Type a descriptive name for the object.
4.Click OK.
QuickTest Documentation

-QuickTest updates the object name and documents it in the documentation field of the Keyword View.
-IMPORTANT: if you start a brand new test, the test will record the original, default object names in the Object Repository.
Object Repository

Object Repository: Object identification default properties
Resources->Object Repository

Resources -> Object Repository Manager

Resources -> Associate Repositories

Resources -> Object Repository

Object Repository -> Merging tool

Object Repository -> Comparison Tool

Subscribe to:
Posts (Atom)